Install The VPN On Windows Server 2019
V.P. N on the Windows Server provides many advantages, which means there is a virtual private network. It is important to allow users to enjoy access to all remote clients, firewalls, etc, in a specific environment.
 Focus on the ideology that everyone should have the safe working
experience with Windows systems. This blog will guide you from the
online technical support company to how to install and configure a V.P. N
on Windows Server 2019. The best steps to install a virtual private network on Windows Server 2019
Focus on the ideology that everyone should have the safe working
experience with Windows systems. This blog will guide you from the
online technical support company to how to install and configure a V.P. N
on Windows Server 2019. The best steps to install a virtual private network on Windows Server 2019
Step 1: Install Remote Access: In childhood, you must create a virtual private network server. A remote access installation is a typical option. To install and configure the remote access, you can deploy either of them - Power Shell or Server Manager.
 Follow these steps:
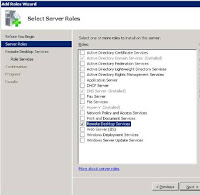
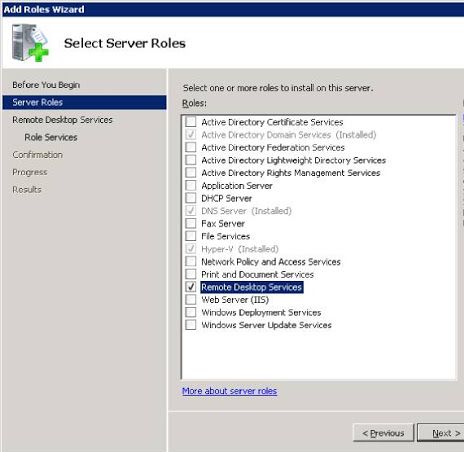
Open Server Manager,
Choose Manage -> Add Roles and Features Wizard,
Display the Remote Access dialog box.
Click Next,
Now Please Check" Direct Access and V.P.N (R.A.S)" Check dialog box.
Click Next,
Click Install.
Besides a period, the process also requires restarting the server.
Step 2: Install, configure, and configure V.P. N: After you install remote access, you can continue to install and configure a virtual private network server. The steps for online technical support professionals to install and configure a V.P.N on Windows Server 2019 are:
 Click
Open Start Wizard. Select the “Publish / Use VPN Only” option, Open the
Routing and Remote Access console, Ok Here, right-click on “Server Name”
and Then select “Configure and Enable Your Routing and Now Let's
Configure Remote Access” To the context menu, you can select Custom
Configuration, click Next. Choose your own VPN network and start the service.
Click
Open Start Wizard. Select the “Publish / Use VPN Only” option, Open the
Routing and Remote Access console, Ok Here, right-click on “Server Name”
and Then select “Configure and Enable Your Routing and Now Let's
Configure Remote Access” To the context menu, you can select Custom
Configuration, click Next. Choose your own VPN network and start the service.
Step 3: Configure Virtual Private Network Access: If you have completed the two mentioned steps, the only thing left is to configure your VPN and access the user. This requires that you open the firewall port and redirect it to Windows Server.
The Port To Open Must Contain: For L2TP on IPSTP: TCP 1701 and UDP 500, For PPTP: TCP 1723 and Protocol 47 GRE, For SSTP: TCP 443,
To do this, you need to continue with the following steps:

First, make it enables Remote Access for all users. Open V.P. N server properties, Click the IPv4 tab and enable Static Address Pool, To enable users to access the network, click Add and Continue by adding the same static IP address from the same server.
That’s it! These three steps will help you install V.P. N on Windows Server 2019. But because the steps are technical, if you are not familiar with Windows 10, the V.P. N, or the technology industry, this process may seem difficult. Here, please contact a reliable Australian technical support company online. Professionals working in this field for many years can help you better and smarter.

Step 1: Install Remote Access: In childhood, you must create a virtual private network server. A remote access installation is a typical option. To install and configure the remote access, you can deploy either of them - Power Shell or Server Manager.
Open Server Manager,
Choose Manage -> Add Roles and Features Wizard,
Display the Remote Access dialog box.
Click Next,
Now Please Check" Direct Access and V.P.N (R.A.S)" Check dialog box.
Click Next,
Click Install.
Besides a period, the process also requires restarting the server.
Step 2: Install, configure, and configure V.P. N: After you install remote access, you can continue to install and configure a virtual private network server. The steps for online technical support professionals to install and configure a V.P.N on Windows Server 2019 are:

Step 3: Configure Virtual Private Network Access: If you have completed the two mentioned steps, the only thing left is to configure your VPN and access the user. This requires that you open the firewall port and redirect it to Windows Server.
The Port To Open Must Contain: For L2TP on IPSTP: TCP 1701 and UDP 500, For PPTP: TCP 1723 and Protocol 47 GRE, For SSTP: TCP 443,
To do this, you need to continue with the following steps:

First, make it enables Remote Access for all users. Open V.P. N server properties, Click the IPv4 tab and enable Static Address Pool, To enable users to access the network, click Add and Continue by adding the same static IP address from the same server.
That’s it! These three steps will help you install V.P. N on Windows Server 2019. But because the steps are technical, if you are not familiar with Windows 10, the V.P. N, or the technology industry, this process may seem difficult. Here, please contact a reliable Australian technical support company online. Professionals working in this field for many years can help you better and smarter.


Comments
Post a Comment